

A Comprehensive Guide: Step-by-Step Tutorial on Using DALL·E for Image Generation
In the ever-evolving world of artificial intelligence, DALL·E has emerged as a groundbreaking tool for image generation. Developed by OpenAI, DALL·E utilizes state-of-the-art techniques to generate unique and diverse images based on textual descriptions. In this step-by-step tutorial, we'll walk you through the process of using DALL·E for image generation while also providing valuable SEO tips to enhance your content visibility.
Step 1: Familiarize Yourself with DALL·E
Before diving into image generation, it's crucial to understand the basics of DALL·E. Familiarize yourself with the official documentation and explore example outputs. This knowledge will help you formulate effective textual prompts for generating images that align with your creative vision or project requirements.
Step 2: Access the DALL·E Interface
Navigate to the official DALL·E interface provided by OpenAI. This user-friendly web application allows you to input textual descriptions and receive corresponding generated images. Ensure you have a stable internet connection and a modern web browser for optimal performance.
Step 3: Craft Detailed Prompts
Effective image generation with DALL·E begins with well-crafted textual prompts. Be specific and detailed in your descriptions to achieve the desired results. Experiment with different prompts to understand the versatility of DALL·E in translating textual input into visually compelling images.
Step 4: Explore Advanced Options
DALL·E offers advanced options to customize image outputs further. Experiment with parameters such as the number of images generated, image size, and aspect ratio. Understanding these options allows you to tailor the generated content to your specific needs.
Step 5: Download and Use Generated Images
Once satisfied with the generated images, download them to your local machine. Explore different use cases for the images, whether it's for creative projects, social media content, or website visuals.
Step 6: Implementing Generated Images into Your Projects
Now that you have your unique images, incorporate them into your creative projects, presentations, or any other context where visually stunning images can make an impact. DALL·E's versatility allows you to explore a wide range of applications.
Step 7: Refine and Experiment
Continuously refine your prompts and experiment with different combinations to push the boundaries of what DALL·E can create. The more you explore, the more insights you'll gain into crafting effective prompts and unlocking the full potential of this AI-powered image-generation tool.
Step 8: Transforming Visual Prompts into Images via Code
To transform the visual prompt into an image using DALL·E, you can use the OpenAI API with Python. Make sure to have the OpenAI Python package installed (openai) and your API key ready.
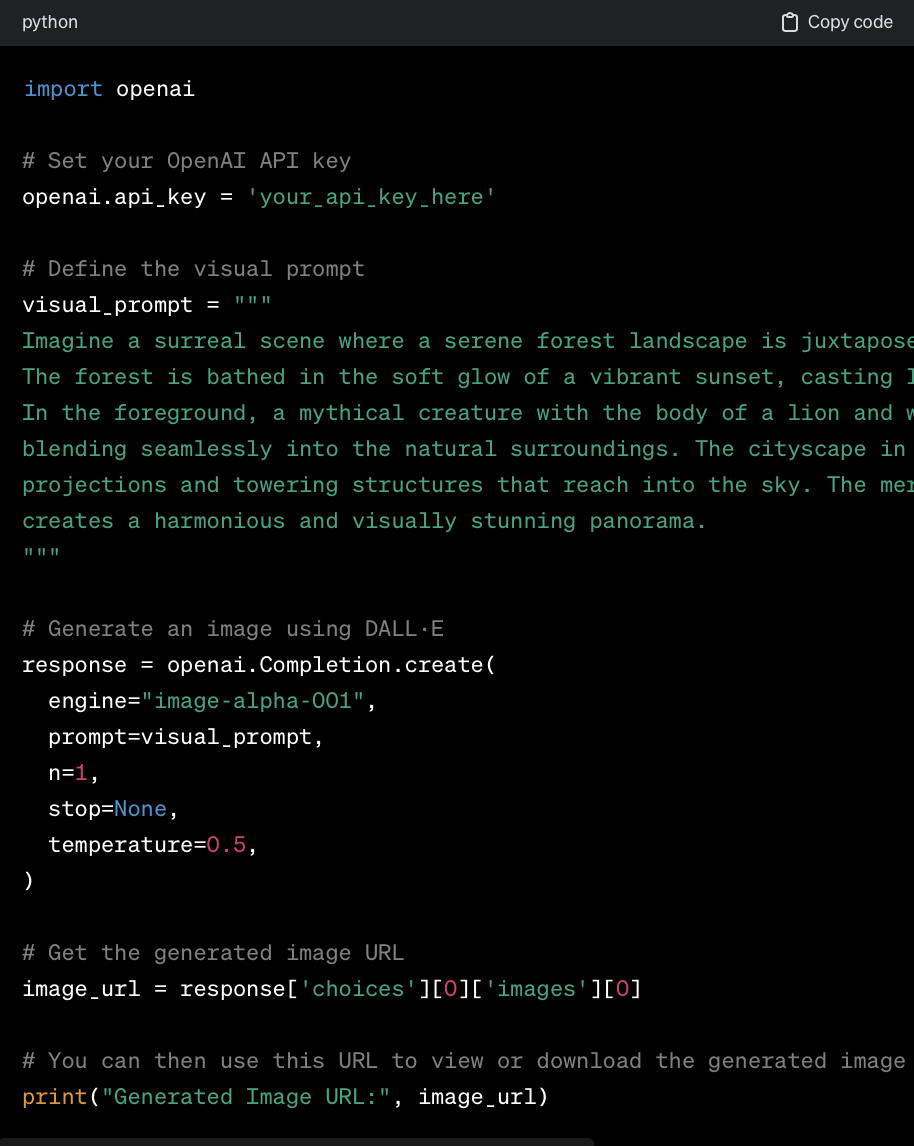
Make sure to replace 'your_api_key_here' with your actual OpenAI API key. The temperature parameter controls the randomness of the generated images; you can experiment with different values to see their impact on the results.
This is a basic example, and you can further customize the code to suit your needs, such as saving the image to your local machine or integrating it into a web application. Additionally, keep in mind that working with DALL·E and the OpenAI API may have associated costs, so be aware of your usage to avoid unexpected charges.
You can also use the images generated by DALL·E in HTML or on a WordPress website.
Here's how you can incorporate DALL·E-generated images into your web content:
Using DALL·E Images in HTML:
Download Images:
After generating images with DALL·E, download the images to your local machine.
Upload to Your Server:
If you have a web server, upload the images to a suitable directory.
HTML Integration:
Use HTML
<img>tags to embed the DALL·E-generated images into your web page.

Using DALL·E Images in WordPress:
Upload Images to Media Library:
Log in to your WordPress dashboard.
Go to Media -> Add New and upload the DALL·E-generated images.
Embed in Posts/Pages:
Create or edit a post or page where you want to use the images.
Insert the images using the Add Media button.
HTML View:
If you are comfortable working with HTML, you can switch to the HTML view of your post/page editor and customize the HTML code as needed.
Remember, while incorporating DALL·E-generated images into your HTML or WordPress site, consider factors like image optimization, responsive design, and proper alt text for accessibility.
Congratulations on successfully using DALL·E for image generation! By following these steps and integrating the generated images into your projects, you've unlocked the creative potential of this cutting-edge AI tool. Continue refining your prompts, experimenting with different concepts, and sharing your experiences to contribute to the evolving landscape of AI-driven creativity.


